Monday 31 August 2009
I made The Top 5!
Flowersoft Fairy
 Challenges
Secret Crafter (47) - Flights Of Fancy (Wings)
The Pink Elephant (30) - 1 Ribbon/2 Squares/Sparkles
Having attached the paper and ribbon to the base card I stamped and watercoloured the image. The wings have been done with Twinkling H2o's and I have added Flowersoft to the blossoms. I then placed a paper frame over the image and applied glitter glue to the edges. I then stamped and layered the sentiment and applied more glitter glue for more sparkle! Finally I stamped and layered a greeting.
Card Recipe
Stamps - Inca Stamps/Mag Freebie
Paper - Papermania
Ribbon/Flowersoft - Stash
Thanks for looking.
Colour Create Challenge (26)
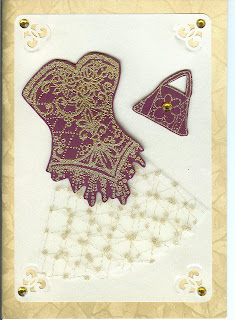+-+Ruby,+Cream+%26+Gold+(Gems).jpg) This week's Colour Create challenge is a colour combo of ruby, cream & gold so here is my interpretation.
This week's Colour Create challenge is a colour combo of ruby, cream & gold so here is my interpretation.
I have made another dress, this time a ballgown. I stamped & heat embossed the bodice onto plain card and cut it out. I then folded half a tulle wedding favour circle and attached it to the bodice. The pearl backing paper has been punched and rounded at the corners and placed onto the patterned pearl base card. I then placed the dress onto it using foam pads (behind the bodice only). Next I stamped & heat embossed a handbag, cut it out and attached in the same way. Finally I added some gems for extra sparkle.
Card Recipe
Stamps - Stampendous/Mag Freebie
Wedding favour Circle - Hobbycraft
Gems - Stash
Thanks for looking.
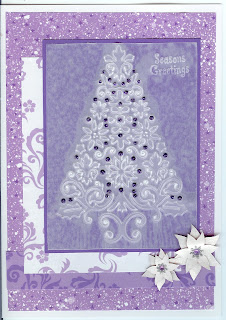
Christmas Tree
 Challenges
Papertake - Sketch
C.R.A.F.T. (14) - Embossing
The image has been done with a Cuttlebug embossing folder onto parchment paper with a stamped greeting added. I have also added glitter glue for some sparkle. I stuck it to the card using a 'sticky sheet' thinking the glue wouldn't show, how wrong was I? Never mind, lesson learnt, I do however quite like the mottly look it gives, goes with the background paper. The flowers are Jak Heath's poinsettias, as used in a previous post, but this time I used the reverse side and heat embossed them with holographic EP and added gems. I'm rather pleased with the results.
Card Recipe
Image - Cuttlebug
Stamp - Anita's
Papers - Funky Fairys
Flowers - Jak Heath
Gems - Stash
Thanks for looking.
Sunday 30 August 2009
The Sugar Bowl Challenge (18)
 This week's challenge at The Sugar Bowl is to follow a lovely sketch and include 'buttons'. I wanted to make another Christmas card using my new paper stack from DCWV so this is what I've come up with, not too sure I like it though.
The image has been coloured with pencils and layered using nesties. The embossed card behind it is silver mirri card which I inked and heat embossed with holographic EP. As the paper is not double-sided I did the same for the corner I turned down. The silver buttons have been threaded with elastic cord with a piece to match tied down the spine of the card.
Card Recipe
Stamp - Sugar Nellie
Paper - DCWV
Sticky Ribbons - Anita's
Buttons/Brad/Cord - Stash
Thanks for looking.
Christmas Bunnies Stocking
 Challenges
Moving Along With The Times (10) - Sketch + Flower Power
Stamp Something - Animal Somethings
One Stop Craft (44) - Cute & Cuddly
Here is another of the lovely new stamp designs from LOTV. This one is from the Christmas Bunnies range and is called 'Stocking' and is designed by Annabel Spenceley. At £3.50 these stamps are a real bargain so why not pop over to LOTV and see what the others in the series are like. Just click here to go to the shop.
Following the sketch I covered the base card with spotty paper. I coloured the image with pencils and added glitter glue to the fur of the hats and stocking before layering it with nesties. This is where I decided to move the sketch about a bit and have tucked the greeting under the image to give me a bit more space. Into the space created I have decoupaged some gorgeous Poinsettias that I shrunk down to fit. Finally, I added another little Poinsettia charm/button at the top.
Card Recipe
Stamps - LOTV/Dovecraft
Paper - DCWV
Decoupage Flowers - Jak Heath
Charm - Stash
Thanks for looking.
Saturday 29 August 2009
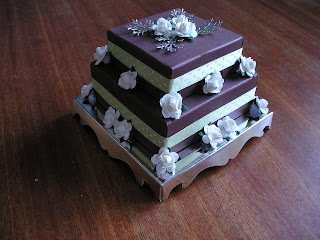
Chocolate Mint Cake
+-+Anything+BUT+A+Card.jpg) Challenges
Challenges
Truly Scrumptious (14) - Anything BUT A Card
Allsorts (16) - NO Rubber Stamping
Well, it's not a card and there is no stamping involved so I guess it fits both challenges.
I made this for my eldest son Shaun's 40th birthday last week (and today is my youngest son's 31st birthday, hope you've been having a great time in Derby Sam). Anyway, every year Shaun asks me if I have made him a 'toothpaste' cake for his birthday (his favourite), and suprise! suprise! this year I said I had and this was what I produced. You should have seen his face... Don't worry, he got the real cake as well.
I made the cake with a 'Card Carousel' template. Each layer was done in brown card to represent the chocolate with the green ribbon to represent the green minty buttercream icing. I then made the stand from silver mirri card and stuck the cake on to the stand. I punched some leaves from the mirri card and arranged them on top of the cake with some cream roses and put more roses around the cake layers.
I must say the template was very easy to work with, I have yet to finish the box for it to go in, the template for this is included. What I like about it as well is that all pieces are cut from A4 card.
Thanks for looking.
BTW do you like my NEW LOOK blog?
Funky Fairys Challenge (31)
 This week's theme is 'Wedding' and the team want us to try and include 'Something Old, Something New, Something Borrowed, Something Blue'. Here goes then -
Something Old - Bodice Stamp
Something New - Gems
Something Borrowed - Mirri Card (recycled from old greeting card)
Something Blue - Card/Ink/Ribbon/Pearls
I think that's covered all the requirements don't you? The base is blue patterned (hearts) pearl card with the corners rounded. Onto that I placed patterned mirri card that I cut from an old greeting card. I edged this with ribbon and a punched border and on the opposite corners I punched, rounded and added pearl hearts. The sentiment is a digi stamp which I coloured the edges of with a stardust pen and added a couple of pearl hearts. Onto the wedding dress... Using a Brilliance inkpad I stamped the bodice onto pearl card and heat embossed with holographic EP. Having cut it out I then folded a 'tulle favour circle' to make the skirt and taped it to the back of the bodice. I attached it to the card with foam pads (behind the bodice only). Finally I added some irridescent gems to the dress.
Card Recipe
Stamps - Stampendous/Funky Fairys Digi
Gems - Papermania
Mirri Card - Recycled
Pearl Card - Crafty Creations/Local Craft Shop
Ribbon/Pearls - Stash
Thanks for looking.
Friday 28 August 2009
Forever Friends Challenge
 This week's challenge is to follow a lovely sketch. I decided to make another Christmas card and used one of the FF stickers which I put onto white card and layered it with red card. I placed swirly paper onto the white base card and then added a stripey rectangle. I stamped and layered a greeting and to finish added some mistletoe stickers.
Card Recipe
Stickers - Forever Friends
Papers - Shabby Princess
Stamp - Inca Stamps
Thanks for looking.
Cupcake Craft Challenge (54)
+-+A+Shaped+Card+(Side+2).jpg)
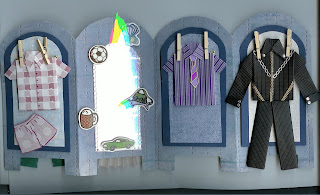+-+A+Shaped+Card+(Side+1).jpg) This week's challenge is to make a 'shaped' card so I think this one fits the bill and is a good way of using up some of those scraps that we all have lying about. All the outfits have been made by folding the paper, origami style, except the shorts which have been stamped and cut out. The biker's outfit is my favourite. The mirrors are made from silver mirri card and decorated with various stickers.
This week's challenge is to make a 'shaped' card so I think this one fits the bill and is a good way of using up some of those scraps that we all have lying about. All the outfits have been made by folding the paper, origami style, except the shorts which have been stamped and cut out. The biker's outfit is my favourite. The mirrors are made from silver mirri card and decorated with various stickers.Thanks for looking.
New Baby
 Challenges
Allsorts (15) - Sketch & Torn Edges
Penny Black (71) - Stitching
Cute Daisy May (26) - Blue & Green
Creative Inspiration (16) - Stitching
Cute Card Thursday (75) - New Beginnings
Stamping For The Weekend (13) - Anything Baby Goes
This card took me right out of my comfort zone. Why? Because I had to TEAR the paper, SHOCK! HORROR! I like the sketch we had to follow though and next time I use it I WON'T be doing any ripping and tearing. I chose to do the card in aqua green and pale blue and added faux stitching around the edges of the image.
Card Recipe
Stamp - Penny Black
Paper - Cute Daisy May
Buttons/Peel-Off - Stash
Thanks for looking.
Daisy - Doodle Palace GDT Card

Last week I won the Doodle Palace challenge which means I'm Guest Designer this week and I get to set the challenge. So the challenge I chose for this week is 'Daisies and Pastel colours' (two of my favourite things). I would love it if you all joined in the challenge here.
I started by covering my base card with this gorgeous pastel spotty paper. Next I placed some matching stripey paper onto a strip of white card, added some brads and attached to the bottom of the card with D/S tape. I then stamped the image (the gorgeous Daisy) and coloured her with my pencils before layering her using my cuttlebug and nesties. I attached this with foam pads. Finally, I have punched the daisies and leaves and added brads to the centres before attaching with foam pads.
Card Recipe
Stamp - Sugar Nellie
Papers - Monti's Pixel Playground
Brads - Stash
Thanks for looking.
Big Star LOTV DT Card

Apologies for the delay in posting this card, I forgot to schedule it, duh!
This week we have a gorgeous sketch by our own Domi to follow and I have used another of the NEW Christmas Teddy stamps from LOTV. This one is called 'Big star' and I have coloured him with my pencils and layered him using nesties. I wanted to create a contempory design, hence the colours. The flowers are punched from handmade paper with brad centred. Hope you like it.
Card Recipe
Stamps - LOTV/Dovecraft
Papers - Funky Fairys
Ribbon - Dovecraft
Buttons/Brads - Stash
Thanks for looking.
P.S. Trying out different text colours, what do you think? Should I stick with these colours or go back to the old ones?
Wednesday 26 August 2009
Tea Time
 Challenges
Paperplay (31) - Sketch
Charisma Cardz (33) - Lemon/Green/Pink
Cute Cards Thursday (74) - Lazy Dayz
Again I am using one of the new stamped images from the new designer range at LOTV. This one 'Tea Time' has been designed by Annabel Spenceley, isn't it just so sweet. Why not pop over and see the rest of the range at LOTV, just click here. The papers I have used for this card are all from Summertime Designs.
Thanks for looking.
Tuesday 25 August 2009
Presents For Two
+-+Sparkly+Black+%26+White+Xmas.jpg) Challenges
Challenges
Simon Says (17) - Christmas In August
Dutch Dare (58) - Christmas In August
Moving Along With The Times (9) - Sketch
Ooh La La (35) - Sparkly Black & White Christmas
For this card I am using one of the gorgeous new designer stamps by Chris Gaisey. There are four Christmas Teddy designs now available from Lili Of The Valley for just £3.50 each. They are also available as pre-cut diecuts with different size images on each sheet. Why not hurry over to LOTV and see all the new designs. To go to the shop click here.
For this card I covered the base card with patterned paper which I added glitter glue to. I then cut a strip of white card, scalloped the edges with a border punch and placed this on top. I stamped and coloured the image with pencils, layered it using nesties and added glitter glue to the hat and parcel ribbons. (The glitter glue unfortunately doesn't show up very well on the computer but I can assure you it's there). I placed the image on top of the white strip using foam pads. Next I added the silver glitter ribbon down the side and finally added a couple of black snowflakes and gems. An unsual colour scheme for Christmas, but I like it.
Card Recipe
Stamp - Lili Of The Valley
Paper - Scrapbox
Gems - papermania
Ribbon/Snowflakes - Stash
Thanks for looking.
Monday 24 August 2009
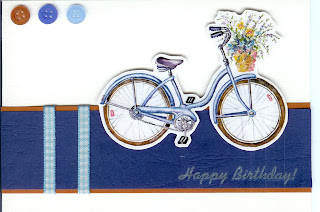
Bicycle
+-+Travel.jpg) Challenges
Challenges
A Spoonful Of Sugar (65) - Travel
The Pink Elephant (29) - Sketch
For this very simple card I first layered some card strips, added ribbon and placed along the bottom. I then applied a silver rub-on greeting. Next I put the PSX bicycle sticker onto white card and cut around it before attaching with foam pads. To finish I added three coordinating buttons. Easy peasy!
Thanks for looking.
Papertake 100th Challenge (Take Your Pick)
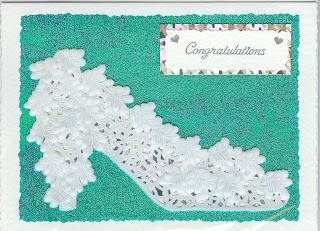.jpg) This week's challenge is a 'Take Your Pick' to celebrate Papertake's 100th challenge. We can pick any of the last 99 challenges to do. I have picked the challenge from 9th June 2009 (Shoe Time). This is my Wedding Shoe which I have done in parchment craft. The shoe is embossed and cut using parchment paper and the backed with holographic card. I then placed it onto my base card which I added green sparkly paper to. I cut the edges of the paper with deckle edge scissors. The greeting is peel-offs with holographic card behind. Hope you like it as much as I do.
This week's challenge is a 'Take Your Pick' to celebrate Papertake's 100th challenge. We can pick any of the last 99 challenges to do. I have picked the challenge from 9th June 2009 (Shoe Time). This is my Wedding Shoe which I have done in parchment craft. The shoe is embossed and cut using parchment paper and the backed with holographic card. I then placed it onto my base card which I added green sparkly paper to. I cut the edges of the paper with deckle edge scissors. The greeting is peel-offs with holographic card behind. Hope you like it as much as I do.Thanks for looking.
Friday 21 August 2009
Someone Special
+-+Blue,+Tan+%26+Cream.jpg) Challenges
Challenges
Penny Black (70) - Blue/Tan/Cream
Sketch & Stash (17) - Sketch (Neglected Sticker)
ABC - B is for Buttons
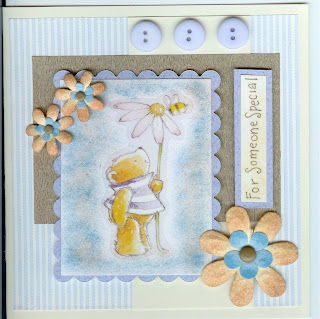
I've made this card following the lovely sketch from the Sketch & Stash challenge and used a neglected PB sticker as the main image. I covered the cream base card with a blue stripey paper and then added a strip of cream card vertically. Next I cut a rectangle of tan textured paper and placed this horizontally. I placed the sticker onto white card and stippled ink around the image before layering it onto blue card using my nesties and attaching with foam pads. I found a neglected sentiment, layered it with the same card and attached with foam pads as well. Finally, I added punched flowers that I also stippled with ink and some nice blue buttons. Hope you like it.
Card Recipe
PB Sticker/Sentiment - Craft Mag Freebies
Tan Paper/Blue Card - Freebie From Friend
Stripey Paper/Buttons/Brads - Stash
Thanks for looking.
Tuesday 18 August 2009
Something Sweet...
+-+Something+Sweet.jpg) Challenges
ChallengesCharisma Cardz (32) - Sketch
Cupcake Crafts (53) - Something Sweet (Cupcakes)
After a couple of dark cards I thought it was time for something lighter so came up with this one.
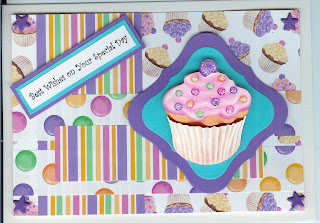
Following the lovely sketch I applied the various papers to the base card. I then cut out several of the cupcakes and decoupaged them onto a couple of mats cut on the cuttlebug using nesties, adding sparkle with glitter glue to the sweeties. I added a stamped sentiment and finally some star brads in each corner. Hope you like it.
Card Recipe
Image/Papers - D.A.I.S.I.E.
Sentiment Stamp - PSX
Brads - Stash
Thanks for looking.
Thinking Of You
 Challenges
Sketch Saturday (64) - Sketch
Roses On Paper (18) - Colours Of Fall (Orange/Brown/Warm Red)
Daring Cardmakers - Lace
These are not colours I would normally think to put together but suprisingly I think they work quite well.
I covered the base card with spotty paper and then embossed the orange card using the cuttlebug and added a punched lace border. On top I added a strip of brown card with a red ribbon along it. After attaching with D/S tape I stamped the sentiment, inked the edges and layered it before attaching with foam pads. Next came the image which I stamped, coloured with MLP pens, inked the edges and layered using nesties and again attaching with foam pads. Finally, I stamped and coloured the flowers. I then cut the petals and used a ball tool to emboss the front and back of each flower to give it shape before attaching with foam pads. Hope you like it.
Card Recipe
Stamps - The Greeting Farm/PSX
Papers - Summertime Designs
Ribbon - Trimcraft
Thanks for looking.
The Sugar Bowl Challenge (17)
 This week's Sugar Bowl challenge is to follow a great sketch and to include 'handmade flowers'. Well, my flowers have been punched out of handmade paper and edged using MLP pens and a lovely metallic brad in the centres. I coloured the image with pencils and layered using nesties. Hope you like it.
Card Recipe
Stamps - Sugar Nellie/PSX
Papers - Making Handmade Cards
Handmade Paper - Papermania
Ribbon - Recycled
Brads - Stash
Thanks for looking.
Monday 17 August 2009
Sleeping Santa
 Challenges
Papertake - Sketch
Funky Fairys (29) - Christmas
Dutch Dare (58) - Christmas In August
Our Creative Corner - Christmas In August
Winter Wonderland (12) - Home For The holidays
Well I never, another christmas card! At this rate I might get ahead this year, doubt it though. Following the sketch I covered the dark green base card with a xmas tree paper. Then came the two rectangles of stars and text and another strip of tree paper down the middle. I decoupaged the cute image of Santa sleeping and backed it with the dark green card and attached with foam pads. I did the same with the greeting. I finished the card by adding the prima flowers with brad centres. Hope you like it.
Card Recipe
Decoupage Image - Funky Fairys
Papers - Monti's Pixel Playground
Prima Flowers & Brads - Stash
Thanks for looking.
At The Beach
+-+At+The+Beach.jpg) Challenges
Challenges
Cute Card Thursday (73) - At The Beach
Colour Create (25) - Blue/Sand/Silver/Black
The Pink Elephant (28) - Summer
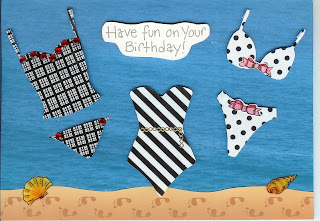
With this card I started by covering the base card with a picture of the sea that I found on the internet (makes a great background paper). I then placed the sandy footprint border along the bottom adding seashell stickers. Next I used a template to cut the swimsuits out of different paper offcuts and decorated them with gems, peel-offs and stickers before attaching with foam pads. Finally I added a recycled silver sentiment. Hope you like it.
Card Recipe
Template - Glitzy Babe No: 3 from Cranberry Cards Co
Sentiment - Recycled from old card
Papers/Border - Scrapbox
Gems/Peel-Offs/Stickers - Stash
Thanks for looking.
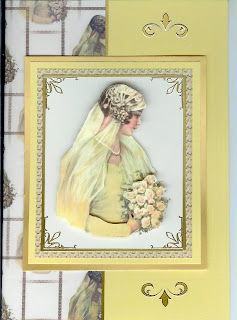
20's Bride
+-+Yellow.jpg) Challenges
Challenges
Crafty Creations (28) - Yellow
Secret Crafter (45) - Fancy Corners
This is one of my favourite decoupage images, it reminds me of my grandmother's wedding photos as she wore a similar outfit. I kept it fairly simple as I didn't want to detract from the main image. The image is backed with layers of yellow and gold pearl card and matching rose paper and then outlined with gold peel-off borders and fancy corners. The base card has a strip of matching paper edged with a peel-off border and a couple of peel-offs on the plain part. Hope you like it.
Card Recipe
Decoupage Image/Papers - Rosemarie Free Download
Cardstock/Peel-Offs - Stash
Thanks for looking.
Sketch & Stash Challenge (16)
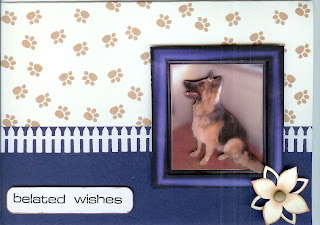+-+Sketch.jpg) Boy, have I been disorganised this past week. This card was supposed to have been posted last week and I've only just got around to making it, hence the greeting. Slap on the wrist for me! Despite this I think the person it's going to will forgive me... Anyway, the base card is made from the 'paw print' card and I have placed a navy panel across the bottom. I then cut the little fence out with the cuttlebug and attached it to the top of the panel. I bought the fence die a little while ago and have never used it, until now. Next I made up the decoupage image and attached it. I stamped the greeting and inked the edges before attaching with foam pads. Finally, I die cut the flower, inked the edges and used a brad in the centre. Hope you like it.
Boy, have I been disorganised this past week. This card was supposed to have been posted last week and I've only just got around to making it, hence the greeting. Slap on the wrist for me! Despite this I think the person it's going to will forgive me... Anyway, the base card is made from the 'paw print' card and I have placed a navy panel across the bottom. I then cut the little fence out with the cuttlebug and attached it to the top of the panel. I bought the fence die a little while ago and have never used it, until now. Next I made up the decoupage image and attached it. I stamped the greeting and inked the edges before attaching with foam pads. Finally, I die cut the flower, inked the edges and used a brad in the centre. Hope you like it.Thanks for looking.
Wednesday 12 August 2009
So Charming
 Challenges
Lili Of The Valley DT - So Charming
Friday Sketchers (64) - Sketch
Doodle Palace (5) - Blue/Green/Bling
Creative Card Crew (23) - Princess Party
ABC - Anything Goes
I started this card by covering the base card with a lace doily. I then cut strips for the side and using a versamark inkpad stamped and embossed flourishes with hologram EP onto the top strip. I stamped my little fairy princess and coloured her with pencils and stardust pens and added a few gems. After layering her I placed her on the card using foam pads. I then 'iced' the flowers and added a charm. I finished off with a few more gems and a sparkly ribbon. Hope you like it.
Card Recipe
Stamps - Lili Of The Valley/Hero Arts
Ribbon/Flowers/Gems/Charm - Stash
Thanks for looking.
Simon Says Challenge (16)
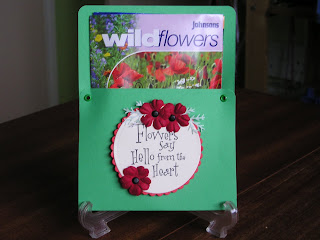+-+Anything+BUT+A+Card.jpg) The Simon Says Challenge this week wants 'Anything BUT A Card' so I am entering this little Seed Packet Holder that I made. I folded the green card and held it in place with a couple of eyelets. I then stamped the sentiment (Hero Arts) and layered it using nesties. I added some flowers and leaves and popped a packet of seeds inside.
The Simon Says Challenge this week wants 'Anything BUT A Card' so I am entering this little Seed Packet Holder that I made. I folded the green card and held it in place with a couple of eyelets. I then stamped the sentiment (Hero Arts) and layered it using nesties. I added some flowers and leaves and popped a packet of seeds inside.Thanks for looking.
Tuesday 11 August 2009
Cute As A Bug
+-+Cute+As+A+Bug.jpg) Challenges
Challenges
Truly Scrumptious (13) - Sketch (Bling)
Colour Create (24) - Pink/Orange/Green (Hearts)
C.R.A.F.T. (11) - 2 Buttons/2 Squares/3 Papers
Secret Crafter (44) - Cute As A Bug
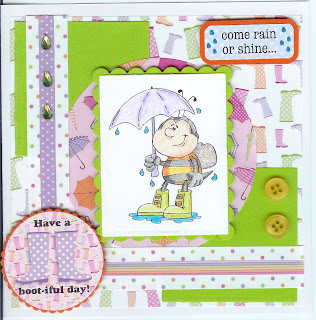
I think this must be the busiest looking card I have ever made. I covered the base card with welly boot paper then added 2 squares of green card. Next came a circle of brolly paper followed by the 2 spotty strips. I coloured the image with pencils and a glaze pen and added glitter glue to his wings and set him in the middle. I then added the sentiments and finally a couple of buttons and some gems. Hope you like it.
Card Recipe
Digi Stamp Image - Dustin pike
Papers/Sentiments - Magazine Freebie
Gems/Buttons - Stash
Thanks for looking.
The Sugar Bowl Challenge (16)
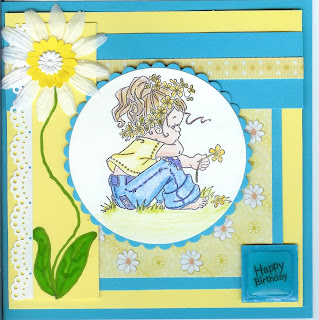+-+Sketch+(Doodling).jpg) Here we are again with the Sugar Bowl challenge, (just skimming in by the seat of my pants), and I've even done a bit of doodling, albeit not very well. The doodling is the stalk and leaves of the large daisy, bet you couldn't guess ha! ha! Not much to say about this card except I have used my very favourite stamp and nice summery colours. Hope you like it.
Here we are again with the Sugar Bowl challenge, (just skimming in by the seat of my pants), and I've even done a bit of doodling, albeit not very well. The doodling is the stalk and leaves of the large daisy, bet you couldn't guess ha! ha! Not much to say about this card except I have used my very favourite stamp and nice summery colours. Hope you like it.
Card Recipe
Stamp - Sugar Nellie
Brad - Lakeland
Greeting - Magazine Freebie
Ribbon - Anita's
Paper/Flower - Stash
Thanks for looking.
A Girl's Best Friend
 Challenges
ABC - Z is for Zero Embellishments
Funky Fairys (28) - Black & White
Charisma Cards (31) - Sketch
I started this card by covering the base card with two design papers following the sketch, then added the black & white card pieces. I embossed a paisley pattern on the white triangular bit using the cuttlebug. Next I cut the circles using my nesties and placed them in the middle. On top of the circles I cut out and paper-pieced the shoe. Finally, I added the sentiment. Hope you like it.
Card Recipe
Image/Sentiment - Jak Heath
Papers - Funky Fairys
Cardstock - Scrapbox
Thanks for looking.
Monday 10 August 2009
A Few Challenges
 Challenges
A Spoonful Of Sugar (63) - Floral Fantasy
Crafty Creations (27) - Buttons
Simon Says (15) - Buttons & Ribbons
Stamp Something - Charmed Somethings
Cupcake Crafts (52) - Sketch + Brown/Blue/Neutral
Cute Daisy May (24) - Floral Fantasy
Stamp With Fun (19) - Birthday
Ooh La La (34) - 3 Buttons/2 Ribbons/1 Charm
The Pink Elephant (27) - Brown/Blue/Neutral
As you can see I'm combining quite a few challenges again with this card. I covered the base card with a neutral backing paper (wallpaper) and attached a strip of brown card which I edged with two ribbons, one with a charm attached (coloured with alchohol inks) and a bow. Next I coloured straight peel-off borders and placed these around the edge. I then cut and embossed the oval with the cuttlebug and placed the coloured digi stamp image on top and attached this with foam pads. I also coloured the peel-off greeting. Finally I added three prima flowers with button centres (coloured with alchohol inks) to the left and five more with gem centres to the right. Hope you like it.
Recipe
Digi Stamp Image - Cute Daisy may
Paper - Recycled wallpaper from sample book
Gems - Papermania
Ribbon/Charm/Buttons/Flowers/Peel-Offs - Stash
Thanks for looking.
Style
+-+S+is+for+STYLE.jpg) Challenges
Challenges
The Rainbow Lady (71) - S is for...
Allsorts (13) - Vintage
I think this vintage lady (Le Suh) has loads of style so I think this card fits both challenges. Again I have used a bubble card to mount the decoupage image in. This time I have not covered the card with paper but I have put a piece behind the image. You might notice that I have given a gem necklace to the lady (from a pack of mobile phone decorations). I added a greeting which I backed with silver mirri card. Then I added the word 'style' and roses using silver peel-offs. Finally I tied an organza ribbon around the card spine. Hope you like it.
Thanks for looking.
Koi Carp
+-+Animals.jpg) Challenges
Challenges
Paperplay (29) - All Creatures Great & Small
Cute Card Thursday (72) - Tealy Good
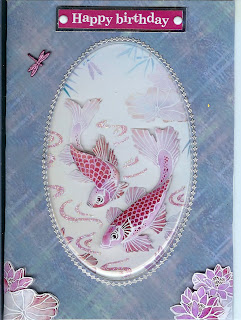
This card was made from a picture I found on the internet, can't remember where from though. I printed it out several times so that I could decoupage the fish. I used a bubble card to mount it in which I first covered with paper. I then cut out the flowers and placed these in the corners, added some peel-offs around the bubble and finished it with a greeting and some brads. Hope you like it.
Thanks for looking.
Steph's Fantastic Candy
Tuesday 4 August 2009
Under The Sea
+-+Under+The+Sea.jpg) Challenges
ChallengesCupcake Craft (51) - The Beach
Creative Card crew (22) - Under The Sea
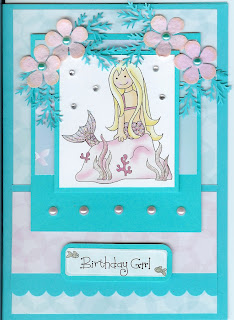
I think this lovely mermaid (Pebbles) from LOTV is absolutely gorgeous and is ideal for these two challenges. I have gone over the seaweed with a clear Sakura Stardust pen and added glitter glue to her tail and finally added clear gems to represent bubbles. The flowers are punched from mulberry paper with pearls in the centres. I hope you like it as much as I do.
Card Recipe
Image/Greeting/Paper - Lili Of The Valley
Pearls/Gems - Stash
Thanks for looking.
Thinking Of You
 Challenges
ABC - Y is for Yellow
Funky Fairys (27) - Thinking Of You
Stamp Something - Paper Pieced Somethings
Friday Sketchers (63) - Sketch
Allsorts (12) - 3 Flowers/2 Papers/1 Ribbon
Papertake - Four Seasons (Summer)
The colours of this card really remind me of Summer, not that we've seen much of it this year. The image has been coloured with pencils and then her clothes have been paper pieced with design paper. The flowers were stamped onto different papers and layered with a button added to the centres. Finished off with a stamped sentiment and ribbon bow. Hope you like it.
Card Recipe
Stamps - The Greeting Farm/Papermania
Papers - Funky Fairys/Papermania
Ribbon Bow - Recycled
Buttons - Stash
Thanks for looking.

