skip to main |
skip to sidebar
 Challenges
Creative Inspiration DT (56) - Mother's Day/Mum
Ooh La La (76) - Mother's Day/Special Friend
Papertake - It's A Mum Thing
Fab 'N' Funky (65) - More Than One Fold
I Love Promarkers (58) - Go Dotty
Simon Says - Mother's Day/Girlie
Dutch Dare (105) - Celebrations
Allsorts (96) - For A Special Lady
Time for another great challenge at Creative Inspiration and this time the theme is Mother's Day/Mum and we are being sponsored by Joanna Sheen who is kindly donating a £10.00 voucher for one lucky winner.
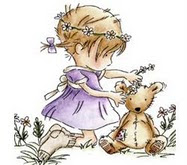
As we no longer have a mother my sister and I exchange Mother's Day cards instead and this is the card I have made for her. As you can see it has more than one fold so a bit different. I have never made one of these before and I don't know what they are called either but, they are great fun to make. I have coloured the image with Promarkers and simply layered it. The sentiment has been stamped and to finish it off I have added a few flowers and gems. I hope you like this little card, thanks for looking.
Card Recipe
Stamps - LOTV/Kanban
Paper - Pink Petticoat
Flowers/Gems - Stash

 Apologies for the late posting of this card but after battling pneumonia for the past month I have had to return to work this week and it has left me exhuasted each day. So much so that all I'm doing is sleeping. Please bear with me for the time being, thanks.
Challenges
Lili Of The Valley DT (90) - Punch It
Cupcake Craft (133) - Monochromatic
A Spoonful Of Sugar (144) Ribbon/Flowers/Gems
Digi Doodle Shop (52) - Ribbons & Bows
Time for another Lili Of The Valley Challenge and this week we have a great sketch by Bev for you to follow. We are again being sponsored by Lisa & Laila who have kindly donated a £10.00 voucher to spend in the LOTV Online Shop. Don't forget, to be eligble for the prize you have to use an LOTV image on your project. The DT have created some beautiful cards so why not pop on over to the blog and have a look.
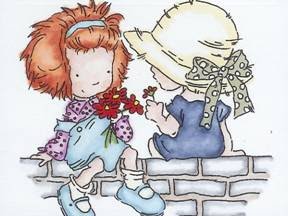
For this week's challenge I thought I would make a wedding card for a change as I've not used this gorgeous image for a long time. I have coloured the image with pencils and glitter, layered it with Nesties and added some gems to the corners. The strips on the left have had both sides punched with a border punch and layered. I then added some punched flowers (with gem centres) and leaves. After adding a sentiment I finished the card off with a ribbon and bow. Hope you like it, thanks for looking.
Card Recipe
Stamps - LOTV
Paper - Pink Petticoat
Ribbon/Gems - Stash

 Challenges
Creative Inspirations DT (55) - Easel Card
Charisma Cardz (10) - Easel Cards
The Rainbow Lady (143) - Best Friends
Time for another Creative Inspirations challenge and this time we want to see your Easel Cards. So, nice and easy! Our sponsor this time is Bunny Zoe Crafts and our monthly sponsor Simon Says Stamp both with fantastic prizes for one lucky winner. The Dt have made some great cards so pop on over to their blogs and have a look.
This is the first time I have had a go at making a 'twisted' easel card and was suprised at how easy it was. I got the tutorial from my DT buddy Cheryl's blog here, thanks Cheryl for an easy to follow tutorial.
I have a 'thing' going on at the moment where I want to try and use some really old stash and believe me there isn't paper in my craft room much older than this one. You know what it was like when you first started making cards and had to have everything whether you used it or not. Well, these papers were no exception, I just had to have all the pads.... This one, like most of them only got used once and what a shame as they are so beautiful.
After covering the base card I added glitter glue to the butterflies on the paper. I have coloured the image/sentiment with pencils and chalk, layered them and added some brads. To finish the card I added a couple of vellum butterflies to which I applied more glitter glue. Thanks for looking.
Card Recipe
Stamps - Dawn Bibby/Inky Antics
Paper - K & Company
Vellum Butterflies/Brads - Stash

 On sale NOW!!!
Just click on the picture above to get yours.

 Challenges
Stamp With Fun (100) - Sketch
Creative Card Crew - Gothic
Stamp Something - Something Digi (Stamp)
Allsorts (93) - Card For Teenager
This card couldn't be more opposite from my last one (see post below) if I tried! I do love this little gothic fairy, although, fair to say I wasn't too sure to start with but she has definately become a firm favourite. I think any gothic teenager would appreciate this simple card, don't you?
I started with a black base card and covered it with shocking pink paper, not that you can see that as I sponged the edges with plum ink. Next I embossed and sanded a piece of cordinations card with swirls. Then came a black panel which I distressed the edges of before placing a piece of design paper on having first ripped the edges. I coloured the image with Promarkers and glitter glues. I added Diamond Glaze to her eyes, lips and nails. I then sponged around the edges with plum and eggplant ink (not too happy with the way this bit turned out). To finish the card I added some card candy and a layered flower.
I didn't quite get as distressed as I normally do about ripping and distressing with this one so maybe I'm getting used to doing it now. Anyway I hope you like my card, thanks for looking.
Card Recipe
Digi Stamp - Stitchy Bears
Papers - Kate Knight
Flowers/Brad/Card Candy - Stash

 Challenges
I Love Promarkers (55) - Green/Purple
C.R.A.F.T. (92) - Mother's Day
Stampin For The Weekend - Springtime
Totally Papercrafts (56) - Pearls/Lace
Penny Black (140) - Pearls/Lace
Sketch & Stash (56) - Sketch (New Image/Old Papers)
Penny Black AT Allsorts - Welcome Spring
As it is Springtime and Mother's Day is fast approaching I have made this card with that in mind. As I no longer have a mother to give a card to this one will go to one of my nieces. My computer tends to change my colours blue and green around so I will just clarify that the colour I have used is indeed green (Pastel Green Promarker) and not blue. Okay, now that is sorted let's get on with the card. I couldn't wait to have a go with this great sketch and it suited my image perfectly. I coloured the image, sentiment, lacey circles, doily and lace with Promarkers so that all the colours would match in with my old papers that I wanted to use. Having attached all the pieces I just added some lace around the image and some pearls around the doily. Hope you like it, thanks for looking.
Card Recipe
Stamps - Penny Black/LOTV
Papers - Old Unknown Stash
Lace/Pearls - Stash

 Challenges