skip to main |
skip to sidebar
 Challenges
The Creative Cottage (19) - Touchy Feely
I Love Promarkers (25) - Christmas In July
Stamp Something - Christmas In July Somethings
Our Creative Corner - Christmas In July
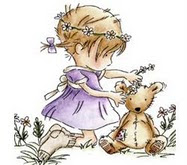
Now for something a little bit different - a side step card! I just adore these cute little girls from the LOTV recent release. You can get them here at only £3.75 each, what a bargain and they stamp so clearly too. I have coloured the images with Promarkers and used 'flocking' on the furry bits to add texture. I have also added glitter around the edges of the images but resisted putting anymore on as I didn't really want it too glittery. The flowers and leaves have all been punched and a pearl added to the centres. Hope you like this one as much as I do.
Card Recipe
Stamps - Lili Of The Valley/Studio G
Pearls - Stash


Challenges
Stamp With Fun (69) - Boy/Man
Ooh La La (59) - Birthday
Fab 'N' Funky (33) - Buttons & Bows
Simon Says - We Are All Going dotty
One Stop Craft (91) - Patterns (Spots & Stripes)
Here's another one using another great stamp from LOTV, again coloured with Promarkers. As it is for a little boy I didn't think ribbon and flowers would be appreciated so I have used buttons and twine. However, if you look very closely you will spot some sneaky blue ribbon going down the centre of the card. Hope you like it.
Card Recipe
Stamps - Lili Of The Valley
Papers - Shabby Princess
Ribbon - Dovecraft
Buttons/Twine - Stash
 Challenges
Ooh La La (59) - Birthday
Simon Says - We Are all Going Dotty
Daring cardmakers - It's A Girl Thing
Allsorts (63) - Dressing Up
One Stop Craft (91) - Patterns (dots)
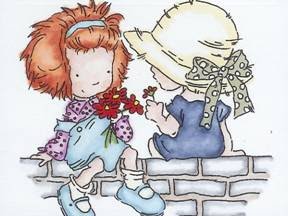
I made this card for a friend a little while ago but have not shown it until now as it was sat under a pile of other cards!!! Note To Self: Must tidy up craft room... Anyway, I have used one of the gorgeous little girl stamps from LOTV and coloured her with Promarkers adding a bit of ribbon to the side. Having stamped the sentiment I coloured the words to match. To finish I added some flowers with gem brad centres. Hope you like it.
Card Recipe
Stamps - Lili Of The Valley/See D's
Paper - Jak Heath
Brads - Papermania
Ribbon/Flowers - Stash
 Challenges
Passion For Promarkers (61) - Distressing
Fab 'N' Funky (32) - Re-Use Or Recycle (Doily)
Simon Says - Sketch
Delightful challenge - No Papers Or Design Embellishments
Paperplay (29) - Blue/Cream/Other (Brown)
Penny Black (111) - It's Christmas In July
Creative Inspiration (39) - Anything Goes
Stamptacular (69) - Christmas In July
Cupcake Craft (101) - Pastel Christmas
What a great sketch to play around with, one I shall use many times I'm sure. For my background paper I stamped and heat embossed Christmas trees over it and then ripped the edges to distress it (it distressed me more). I then decided to re-use an old doily which I inked with a couple of Brilliance ink pads. The snowflake border was made using a Cuttlebug embossing folder and then wiping a Distress ink pad over the top. The punched flowers were coloured with the Distress ink pad and then glittered. The main image has been coloured with Promarkers (definately my favourite pens) and glittered along the edges.
Card Recipe
Stamps - Penny Black/Woodware
Doily - Stash
Thanks for looking.
 Challenges
Pollycraft (53) - Happy Birthday
Digital Tueday (68) - Happy Birthday
ABC - Z is for Zig Zag Card
Charisma Cardz (29) - Anything But Square
Digi Doodle (17) - Anything Goes
Stamp Something - Something flowery
Secret Crafter (93) - Fairytales
I made my card using a template I bought at the Farnborough show. I thought it was about time I had a play with it. I covered both sides of the card with coordinating papers, adding some gems to the front. Having coloured the digi stamps with Promarkers, chalks and Sakura Stardust pens I added glitter to their tails. I also added Diamond glaze to the bubbles. I then layered the images onto holographic card. The flowers and leaves have all been punched out of various glittery and mirri card with a gem added to the centre of the flowers. Altogether very sparkly and glittery!
Card Recipe
Digi Stamp - Pollycraft
Papers - Papermania
Greeting - Lili Of The Valley
Gems - Paper Cellar
Thanks for looking.
 Challenges
The Sugar Bowl (39) - Sketch/Blue
Cute Card Thursday (121) - Get A Head Start (Xmas)
Here is a quick Christmas card using an old favourite of mine. The image has been coloured with pencils and layered onto silver mirri board. The larger square behind is also silver mirri board although it looks quite black. The punched snowflakes are also mirri board topped with gems. I have also added gems to the image.
Stamp - Sugar Nellie
Paper - Old Magazine Freebie
Gems - Stash
Thanks for looking.
 I've just come across this and thought you might like to know about it. If like me you love fairies and all things magical then this is the challenge for you. It starts on Monday 26th July so make sure you pop the date in your diaries. Just click on the picture to go to the blog, see you all there...
 Challenges
Sketch Saturday (111) - Sketch
A Spoonful Of Sugar (111) - Sending Donkey Smiles
Passion For Promarkers (60) - Animals
Some of you may already know from her blog, that A Spoonful Of Sugar design team member Michelle had an accident about three weeks ago, which has left her with the loss of her right eye and a long road of recovery ahead. In an effort to cheer her up and raise awareness for what happened to Michelle A Spoonful Of Sugar are holding a card drive in her honor so if you can please give this lovely lady your support and well wishes too.
I have coloured my little donkey with pink, green and grey Promarkers (I always think of donkeys as being grey). I have used paper lace on the two strips and the flowers are punched with pearl centres.
Card Recipe
Digi Stamps - Whimsey Freebie
Papers - Funky Fairys
Pearls - Stash
Thanks for looking.
 Challenges
Ooh La La (58) - Christmas In July
The Cuttlebug Spot - Sketch + Own theme (Xmas)
Fab 'N' Funky (31) - It's Christmas In July
Here's another card using one of the new Christmas stamps that are RELEASED TODAY at Lili Of The Valley. The new designs are sooo gorgeous they will fly off the shelves so pop on over to the webshop and bag one or more before they sell out, you won't be disappointed!
I have coloured the image with Promarkers and a touch of glitter glue (adding baubles to the tree). I have also glittered around the edges of the image and some of the layers. I used the snowflake CB embossing folder to make the white panel at the back and added glitter to some of the snowflakes. The border along the bottom has been punched with a MS border punch and layered. The flowers are punched with snowflake and gem centres.
Card Recipe
Stamps - Lili Of The Valley
Paper - Magazine Freebie
Gems - Stash
Thanks for looking.
 Front
Front Inside
Challenges
Truly Scrumptious (36) - Sketch + How Does Your Garden Grow
Stamptacular (66) - Aperture Creations
Secret Crafter (91) - Apertures
Passion For Promarkers (59) - Give Us A Laugh
This one was rather a challenge as I very rarely attempt an aperture card where I have made the aperture myself. I cut the aperture using Nesties and framed it. The image has been coloured with Promarkers and the sentiment has been handwritten. The gardening tools are peel-offs which I have coloured with the Promarkers.
I thought that with all this beautiful hot weather that this was probably how a lot of gardening is being done...
Card Recipe
Stamps - Lili Of The Valley
Papers - My Mind's Eye
Peel-Offs - Stash
Thanks for looking.
 Challenges
Lili Of The Valley (57) - Sketch (DT Card)
Stamp Something - Colours Of Your Flag (Wales)
Daring Cardmakers - Rubies For July
Digi Doodle (15) - Texture
I can't believe that we are already in July and that Christmas is only five months away!!! Where on earth has the last six months gone?
Lili of the Valley are helping to satisfy your Christmas stamping desires early with some fantastic festive images!! There will be over 40 designs released in the next couple of months including some gorgeous Kids Nativity stamps which you won’t be able to resist, loads of traditional Christmas characters and scenes which are just so cute, plus Polar Bears, Pups and Penguins and more of their fantastic Bear, now called James! The first set of 15-20 designs are released next Wednesday 14th July so look out for sneak peaks and beautiful cards on all the LOTV Design Team’s Blogs!
LOTV are offering two brand new Christmas stamps of your choice to the winner of this Challenge, you will see some of the images on the DT’s cards this weekAgain this fortnight at LOTV we have a great sketch by Dawny P to follow and I hope you will all join us to take up the challenge here. Don't forget though, in order to qualify for any of the prizes you MUST use a LOTV image.My card features one of the gorgeous new LOTV Christmas stamps from the 'people' range and I have coloured her with Promarkers. I have used white Flowersoft to make her muff all fluffy and found it worked very well. The sentiment is in fact the name of the stamp which I thought I would use rather than an ordinary Christmas greeting.
Card Recipe
Stamp - Lili Of The Valley
Papers - Summertime Designs
Ribbon/Flowers - Stash
Thanks for looking.

Front
 Inside
Challenges
Just Magnolia (62) - Criss Cross Card
Totally Papercrafts (23) - One For The GirliesWell, here is a card that went wrong from start to finish... You won't believe how many times it has gone wrong, but I got there in the end. I have not added a sentiment to the band as I'm not sure who will be getting it yet so will add it later. Also, as I wanted it to open and stand up on it's own so I have attached the image mat to the base card itself. The image has been coloured with Promarkers and cut out so that Tilda can 'sit' on the strip. I covered her wings with glitter glue and added some gems to the corners for added sparkle. The band going around the whole card just has ribbon and a punched flower with gem attached. One of my many mistakes was when I was cutting the design paper for the 'criss cross' pieces so now BOTH sides are decorated with the paper. I have kept the design very simple as I wanted Tilda to be the main focus. Hope you like it.
Card Recipe
Stamp - Magnolia
Paper - From A Friend
Ribbon/Gems - Stash
Thanks for looking.
 Challenges
Ooh La La (57) - Simply Summer
Digital Tuesday (65) - Summertime
Papertake - In Stitches
ABC - X is for Xtra Dimension
Simon Says - Check It Out
The Creative Cottage (17) - Summer Suprise
Dutch Dare (81) - Flower Inspiration Picture
M.A.W.T.T. (53) - Sketch
Digi Doodle (14) - Circles/Dots
Mami Doodles (6) - Blue/White/Green/Touch Of Red
Wow! I can't believe I managed to get 10 challenges out of one simple card!
Using the great sketch I lengthened it to make an A5 card. The base card is actually white with a blue piece on top that is attached with foam pads. I then added one of my favourite green check papers, can't remember where it came from though, sorry. The strip across the middle has been punched with a Fiskars border punch with ribbon and circle brads added. The freebie digi stamp has been coloured with Promarkers and decoupaged to add extra dimension. If you look closely you will see I added extra dots to the centre of the flower as it looked a bit too plain. I also did some faux stitching in each corner. After decoupaging the image I was left with a few extra leaves which I have added at the bottom. To finish the card I punched some butterflies, adding some Glamour Dust and placed these at the top. Hope you like it.
Card Recipe
Digi Stamp Freebie - Mami Doodles
Paper - scrapbox
Ribbon - Trimcraft (Smirk)
Brads - Stash
Thanks for looking.
 Challenges