skip to main |
skip to sidebar
 Challenges
A Passion For Promarkers (88) - One For The Boys
Fab 'N' Funky (61) - 1 Image/2 Embellishments/3 Papers
I Love Promarkers (54) - Stitching
Friday Sketchers (143) - Sketch
Whoopsi Daisy - Let's Get All Cute
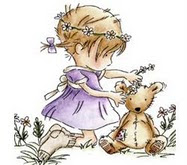
Here is another of the new stamps being released on 9th March by Lili Of The Valley. This one is called 'Birthday Bumps' and is such a fun image it is bound to be very popular.
I have decided to make a male themed card this time and followed the great sketch. I turned the sketch so that the image would fit better and as I don't yet know who the card will be for I have not added a sentiment. I have coloured the image with Promarkers and layered it with Nesties. I added faux stitching around the edge of the bottom layer of paper and embellished another layer with a piece of satin ribbon and some little flower stickers. Another fairly clean and simple card, hope you like it, thanks for looking.
Card Recipe
Stamp - Lili Of The Valley
Papers - Pink Petticoat
Ribbon/Stickers - Stash

 Challenges
Lili Of The Valley DT (86) - Circles
Sketch & Stash (55) - Sketch (Neglected Paper)
A Gem Of A Challenge (15) - Use Any - Buttons/Brads/Beads/Bows
One Stop Crafts (119) - Birthday Card/Cake
Secret Crafter (122) - Fancy Folds
Cupcake Craft (130) Cake or Ice Cream
A Spoonful Of Sugar (140) - Birthday Wishes
Digi Doodle Shop (48) - Spots/Dots
Time for another Lili Of The Valley challenge and this week we want to see lots of circles on your projects. We are again being sponsored by Lisa & Laila who have kindly donated a £10.00 voucher to spend in the LOTV Online Shop. Don't forget, to be eligble for the prize you have to use an LOTV image on your project. The DT have created some beautiful cards so why not pop on over to the blog and have a look.This time I have made a fold-back card for a change as I rather like the look of these when they are stood up. I loved this great sketch but as I wanted the ribbon on the left I turned the sketch upside down. I have covered the base card with some of my neglected papers which I haven't used for a while and I have coloured the image with my Promarkers and layered it with circular Nesties. The circular sentiment has also been layered in a similar way. After punching a border I added a gorgeous satin ribbon and bow to finish the card. Hope you like it, thanks for looking.
Card Recipe
Stamps - LOTV
Papers - My Mind's Eye
Ribbon/Bow - Stash

 Challenges
Charisma Cardz (7) - Spring Has Sprung
Delightful Challenges - Animals
Friday Sketchers (142) - Sketch
Stampin For The Weekend (4) - Monochrome
Allsorts (91) - Nature
C.E.S. (24) - Spots & Stripes
Digital Tuesday (99) - Punches
Crafty Creations (107) At The Bottom Of My Garden Lives...
Today I have a little sneak peek for you from the new LOTV Spring stamp collection being released on 9th March. The collection is full of the most sweetest little animals ranging from bunnies to an elephant! To see more sneak peeks check out the DT's blogs (links in sidebar) and the Ideas To Inspire blog .
Right, onto my card. This is my take on the great sketch and the image I have used is called 'Spring Swing'. The image is coloured with Promarkers and chalk, as is the tree. I have also added flock to the bunnies tail. I have then layered it with Nesties and tied some sisal around it. Also in the corner I have added a couple of punched flowers with gem centres. Well, I hope you like this one, thanks for looking.
Card Recipe
Stamps - LOTV
Tree Stamp - Docrafts
Digi Papers - Pink Petticoat
Eyelets/Gems/Sisal - Stash

 Challenges
Papertake - Putting On The Glitz
Fab 'N' Funky (60) - Make Your Own Embellishments
Simon Says - Make Your Own Embellishments
Paperplay (7) - Add Shine
Cute Card Thursday (152) - Shiny Happy Cards
Dutch Dare (100) - Sparkle/Glitter/Bling
Stamp Something - Funky Somethings
Totally Papercrafts (54) - Do It With Digis
Here is a card I made a little while ago for a friend at work. He is very into music and collects old vinyl records so I thought this digi would be ideal for him. I coloured the image with Promarkers and added lime green glitter to his shirt before cutting him out and placing him on some leather look card. I then added a few star stickers to the background. The strip on the right side has been punched with a border punch and glittery ribbon added. The sentiment is computer generated. The stars have been punched from holographic card and I have added gems and musical note charms to them. I hope you like my funky little card, Stephen did. Thanks for looking.
Card Recipe
Digi Stamp - Just Inklined
Paper - Bearly Mine
Ribbon/Stickers/Gems/Charms - Stash

 Challenges
Lili Of The Valley DT (85) - Favourite Colour Combo
Totally Papercrafts (53) - Clean & Simple
Digi Doodle Shop (47) - Anything Goes
Time for another Lili Of The Valley challenge and this week we want to see your favourite colour combos. We are again being sponsored by Lisa & Laila who have kindly donated a £10.00 voucher to spend in the LOTV Online Shop. Don't forget, to be eligble for the prize you have to use an LOTV image on your project. The DT have created some beautiful cards so why not pop on over to the blog and have a look.My favourite colour combo at the moment is aqua and yellow which I think is quite fresh and summery. I have coloured the image with Promarkers as usual and gone for a clean and simple design. I have stamped little ballet shoes onto the punched strip and added a circular sentiment to the flower. Hope you like it, thanks for looking.
Card Recipe
Stamps - LOTV/Creative Impressions
Papers - Papermania
Flower - Stash

 Challenges
Penny Black At Allsorts - Say It With Flowers
Crafty Creations (105) - Three Words
Cute Card Thursday (151) - Hearts & Flowers
Digi Doodle Shop (46) - Nature
Paperplay (6) - Hearts & Flowers
Daring Cardmakers - Recipe
Mami Doodles (20) - Flower Card
Penny Black (138) - Pretty In Pink
Secret Crafter (121) - A Stamped Flower
Sketch Saturday (142) - Sketch
Whoopsie Daisy - Free & Easy
I fancied a change from making a cute card so I have made this floral one. I have coloured the image with Promarkers as usual and layered it using Nesties, then added a ribbon bow. The panels and borders have been punched and I have added another piece of ribbon to one. A few brads and a heart button finishes the card. Hope you like it, thanks for looking.
Card Recipe
Stamps - Penny Black/LOTV
Paper - Papermania
Ribbon - Recycled
Brads/Button - Stash

 Challenges
Creative Inspirations DT (53) - Distressing
Charisma Cardz (6) - Mythical/Fantasy
Time for another challenge at Creative Inspirations and this time we want to see 'Distressing' on your projects. For this challenge we are being kindly sponsored by Stitchy Bear Stamps and our monthly sponsor Simon Says Stamp.
The DT were lucky enough to be given some digis from Stitchy Bear Stamps to play with and I chose this little Gothic fairy called 'Dareama'. As soon as I saw her I fell in love with her. I chose a plain cream base card to start with. Next I distressed and glittered a piece of black card and having ripped the edges of this gorgeous paper (that hurt!) I stuck it on top. I them embossed a piece of coredinations card and lightly sanded it before distressing and glittering the edges. Now onto the image which I resized to fit this Nestie label die. I coloured her with promarkers and added pink Glitter. After chalking around the image I used a marker pen to go around the edge of the Nestie. The flowers, leaves and butterfly have all been punched and I have added roses to the centres of the flowers. A touch of glitter glue on the roses finishes them off. I think this turned out rather well don't you? Hope you like it, thanks for looking.
Card Recipe
Digi Stamp - Stitchy Bear Stamps
Paper - Kate Knight
Roses - Stash

 Challenges
Lili Of The Valley DT (84) - Sketch
Creative Card Crew - For A Loved One
Fab 'N' Funky (59) - Tempting Texture
Delightful Challenge - Get Punchy
It's Thursday and time for another challenge at Lili Of The Valley. This week we have a great sketch for you to follow and are being sponsored by The Ribbon Girl who has donated a fantastic prize for one lucky winner. Don't forget though, to be eligible for the prize you MUST use an LOTV image on your project.
I was asked to make this card by the grandmother as they were expecting the baby on the 18th February. When I gave her the card this morning she said the timing was perfect as the baby had been born at 2am today, obviously couldn't wait to see the card ha! ha! Welcome to the world little Alfie Charles!
The main image has been coloured with Promarkers and chalk and I have added flock to his hat and blanket for texture. I then layered it using several Nesties. I have done the sentiments in a similar way. I have used a border punch on some of the panels to add a bit of interest. To finish I have added some die cut flowers and placed roses in the centres. Hope you like it, thanks for looking.
Card Recipe
Stamps - LOTV
Grandson Sentiment - Computer Generated
Papers - Pink Petticoat
Roses - Stash

 Challenges
Digi Doodle Shop (45) - Valentines
Dutch Dare (98) - Buttons
Our Creative Corner - Tree/C & S
Ooh La La (73) - Someone Special
Pollycraft (79) - Sketch/Love
Stamp With Fun (97) - Love
Whoopsie Daisy - Give Us Your Heart
A Spoonful Of Sugar (138) - Let's See Some Love
Digital Tuesday (97) - From The Heart/Valentine
Papertake - Have A Heart
Passion For Promarkers (86) - Let There Be Love
A big warm welcome to all my recent new followers and thank you for your lovely comments. I appreciate you taking the time to visit my little blog to see my creations.
Although I have followed the great sketch I did turn it and then drop the sentiment down as it looked better there. The image has been coloured with Promarkers and layered with Nesties. The butterflies have been punched with gems added. Some sparkly ribbon bows tied through the heart shaped buttons finish the card. Quite a clean and simple design, hope you like it and thanks for looking.
Card Recipe
Stamps - LOTV
Digi Papers - Pink Petticoat
Buttons/Ribbon/Gems - Stash

 Challenges
The Sugar Bowl (52) - Sketch/Love
Stamp Something - Digi Somethings
Stampin' For The Weekend (3) - Valentine
Allsorts (89) - Love
C.E.S. (22) - Red/Romance
Secret Crafter (120) - Valentine
Stamptacular (97) - Hearts Gone Wild
Here is another of the gorgeous 'Simply Adorable' digi stamps from Sugar Nellie. This one is called 'Verity'. I have coloured her with Promarkers and chalk. The white pieces were cut with heart Nesties, embossed, layered and cut in half before tucking behind the image. A few flowers and a sentiment finish the card. Hope you like it, thanks for looking.
Card Recipe
Digi Stamp - Sugar Nellie
Sentiment Stamp - LOTV
Papers - Magazine Freebie
Flowers/Spacers/Brads - Stash

 Challenges
Lili Of The Valley DT (83) - Romance
Stamptacular (96) - Whateva
Papertake - Anything Goes
ABC - N is for Nesties
I Love Promarkers (51) - Anything Goes
Simon Says - Love Is In The Air
Paperplay (5) - Stamp It Out
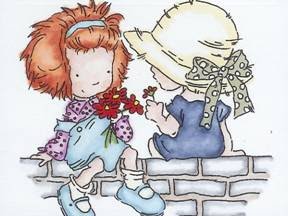
Time for another Lili Of The Valley challenge and this week we have a great sketch for you to follow. We are also being sponsored by Wild Orchid Crafts who are donating some gorgeous flowers. Don't forget, to be eligble for the prize you have to use an LOTV image on your project. The DT have created some beautiful cards so why not pop on over to the blog and have a look.
When I first saw this gorgeous stamp I thought that this cute little couple were looking at their courtship photos and reminiscing, so romantic don't you think? I have coloured the image with Promarkers as usual and added the name of the album to the image. All the mats and layers were cut using my Nesties. A sentiment and a few simple flowers complete the card. Hope you like it, thanks for looking.
Card Recipe
Stamps _ LOTV
Paper - Pink Petticoat
Flowers/Brads - Stash

 Challenges